Would you like to add icons within your forms? Icons can be a great way to visually reinforce the purpose of a field, and can help your forms look more customized.
In this tutorial, we’ll discuss how to add icons from Font Awesome to your forms. Font Awesome is a great option because their icons act like a font, meaning that they will adopt the same color and sizing as the other fonts on your site.
Here are the topics we’ll cover in this tutorial:
- Adding Font Awesome to Your Site
- Finding an Icon on Font Awesome
- Displaying Icons in:
Adding Font Awesome to Your Site
The first step is to add Font Awesome’s icon library to your site. This can be done in many ways, from adding code to your site’s header to installing a plugin. For details on each option, check out WPBeginner’s guide to adding icon fonts.
To keep things simple, we’ll use the plugin method with Better Font Awesome.
Better Font Awesome is a free WordPress plugin that adds the resources needed to use Font Awesome icons on your site. When you’re ready, go ahead and install this plugin.
Once this plugin is installed and activated, you’re ready to start adding icons to your forms!
Finding an Icon on Font Awesome
Now that we have the ability to use Font Awesome on our site, let’s check out how to grab information for the icon you want in your form.
Any icon from Font Awesome’s icon library will work in the same way, but for this example we’ll use their paper airplane icon.
Once the icon page is open, we need the unicode value. This is displayed just below the icon name. The unicode for this paper airplane icon is f1d8.
![]()
Displaying Icons In Front of Form Titles
![]()
To add an icon in front of our form’s title, we need to create some custom CSS that will insert this icon for us. This CSS will be a little different depending on whether you want the icon to appear in front of the title of all WPForms on your site, or just this one form.
Add Icon to All Form Titles
The CSS to display an icon in front of all form titles is simple because it can be more general. Here’s the CSS you’ll need:
div.wpforms-container-full .wpforms-form .wpforms-title:before {
    content: '\f1d8'; /* Unicode for icon, be sure to keep the quotes and backslash */
    font-family: FontAwesome;
    margin-right: 10px; /* Distance between icon and title */
}
If you check out the first line, with content, you’ll notice that the unicode is included after a backslash (\). This value can be replaced with the unicode for any other icon in Font Awesome’s library.
This CSS also includes a right margin of 10 pixels. Without this, there would be no gap between the icon and the form’s title. This number can be changed however you’d like.
Add Icon to a Specific Form’s Title
Instead of adding the same icon to the titles of every form on your site, you can use more specific CSS to target only one specific form.
To target a single form, you’ll need to find the unique ID number for your form. You can locate this by looking at the shortcode used to embed your form, or by opening WPForms » All Forms. The ID number for each form is shown within the shortcode.
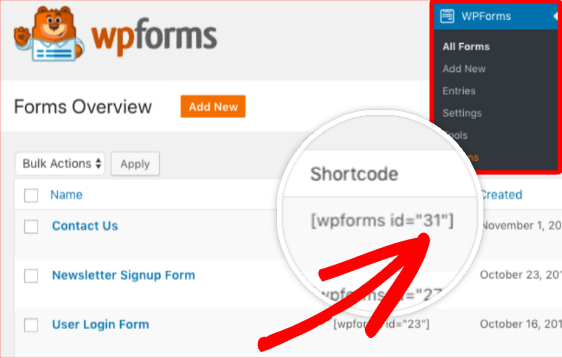
We will use this ID number, 31, to make our CSS more specific. Here’s the CSS that will only add an icon in front of the title of this single form:
div.wpforms-container-full#wpforms-31 .wpforms-form .wpforms-title:before {
    content: '\f1d8'; /* Unicode for icon, be sure to keep the quotes and forward slash */
    font-family: FontAwesome;
    margin-right: 10px; /* Distance between icon and title */
}
This CSS is almost exactly the same as the style that will change all forms on your site. The only difference is that we added #wpforms-31, so now this style will apply only within this one form.
For your own form, you’ll just need to change the form ID number and replace the unicode for the icon you want, as described in the section above.
Displaying Icons In Front of Field Labels
![]()
Displaying an icon in front of all field labels requires very similar CSS to what was described above for form titles:
div.wpforms-container-full .wpforms-form .wpforms-field-label:before {
    content: '\f1d8'; /* Unicode for icon, be sure to keep the quotes and forward slash */
    font-family: FontAwesome;
    margin-right: 10px; /* Distance between icon and title */
}
Target A Single Field’s Label
You may not want the same icon to appear next to every field. To target only a single field, we’ll need to make our CSS more specific by locating the unique ID for the field.
This approach is very similar to targeting a single form’s title, described above.
First, you’ll need to right click on the field you’d like to target and choose Inspect.
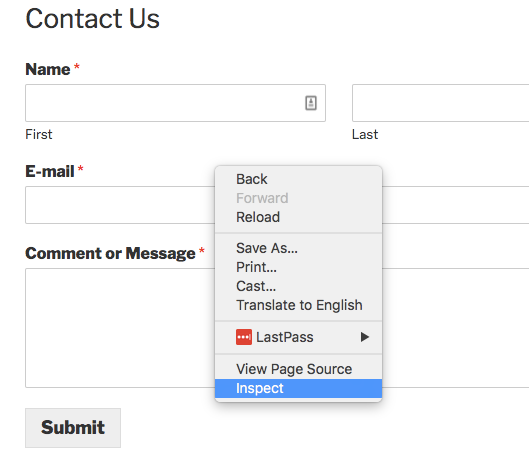
Now your screen should split to show HTML from the page. Make sure the entire field you want to target is highlighted (including the label and input box), then look for the ID.
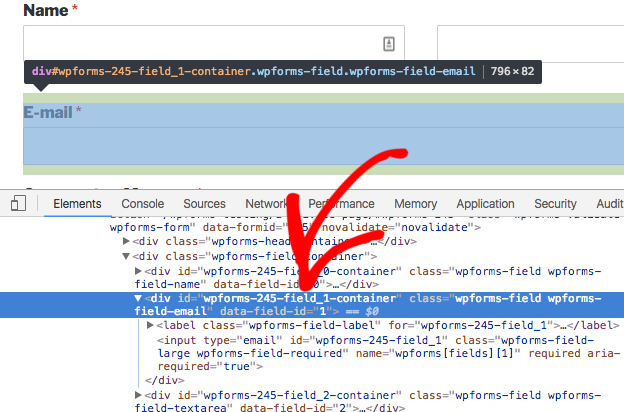
For this field, the ID is wpforms-245-field_1-container. Here’s how we’d make the icon label CSS specific only to this single field:
div.wpforms-container-full .wpforms-form #wpforms-245-field_1-container .wpforms-field-label:before {
    content: '\f1d8'; /* Unicode for icon, be sure to keep the quotes and forward slash */
    font-family: FontAwesome;
    margin-right: 10px; /* Distance between icon and title */
}
If you check out that first line of the CSS, you’ll notice that we added a ‘#’, followed by the ID we just found. Now our icon will only be added to this single field, without altering any other field labels (in this form or any other form).
Displaying Icons In HTML Fields
Adding icons to HTML fields is the simplest option, and requires no custom CSS.
All you’ll need is to add some simple shortcode within the HTML field. As an example, here’s the shortcode we’d need for the paper airplane icon:
[icon name="paper-plane"]
![]()
To adjust this for a different icon, you’d just need to copy the name from the specific icon’s page in Font Awesome. The icon name will be in large text near the top of the page.
![]()
Then, you’d replace paper-plane in the shortcode with the name of the icon you want to use.
In an HTML field, you can also add additional text and/or HTML around the icon shortcode if you’d like.
That’s it! You can now add icons to multiple places in your forms, and even target only specific forms or fields to add an icon.
Would you like to style your forms even further? Check out our article on Beautiful Contact Form Designs You Can Steal (this includes how to add an icon to your Submit button).