Want to make sure that your form works properly before displaying it on your site? Testing your form is the best way to ensure a smooth experience for you and your users.
In this tutorial, we’ll share the most important questions to answer before launching a form on your site, as well as tips to address issues and improve user experience.
- Getting Started: How to Preview a Form
- Functionality
- User Experience
- What to Do If You Have Questions
Getting Started: How to Preview a Form
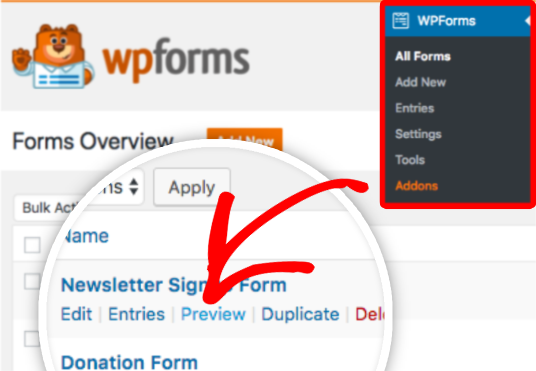
WPForms makes it easy to test your form before adding it to a page or post on your site. To do this, go to WPForms » All Forms. Then, hover over the form title to display an additional menu of options. Once the options appear, click Preview.
We recommend using this form preview as you check through the questions below.
Is Form Validation Working Properly?
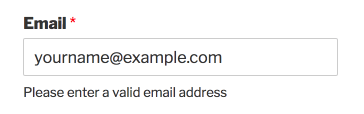
Validation messages help users easily see if they skipped a required field or entered a value with an incorrect format.
To test if validation is working, try submitting your form without filling out any fields. Any empty, required fields should display a red message stating “This field is required”.

Next, try entering an incorrect format into any field that has format rules (such as the Email field).
If validation messages aren’t displaying properly, the next step is to check for a code conflict.
Does the Form Notification Email Deliver Successfully?
When enabled and set up properly, notification emails will automatically be sent out as soon as a form is submitted.
However, due to server configuration issues and/or spam filtering by the recipient’s email provider, sometimes emails aren’t able to deliver successfully.
To test, go ahead and submit the form. Then, check to be sure that the email arrived.
If your form’s notification email didn’t arrive or was marked as spam, or if you’d like to avoid delivery issues potentially developing in the future, the next step is to set up SMTP on your site. This will authenticate your emails so that they consistently deliver successfully.
For all the details, as well as step-by-step setup guides, be sure to check out our tutorial on recommended SMTP options.
Optional Functionality: Are Conditional Logic and Integrations Working?
If your form includes conditional logic, email marketing connections, payments, or any other integration, be sure to check these are all working properly.
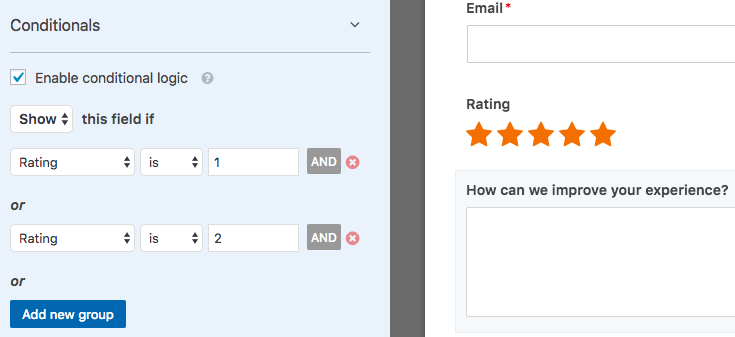
1. Conditional Logic: Is every condition working properly?
To test, be sure to try out any conditions that you’ve added to your form.
If conditional logic isn’t working as expected, the best next step is to double check the condition rules for any possible issues. If the rules appear correct and logical, the next step is to check for a code conflict.
2. Email Marketing Integrations: Are new subscribers added when a form is submitted?
If you see any issues with your email marketing integration, the best next step is to check back through the setup tutorial for the integration you’re using. Here are our available marketing integration options with links to each setup tutorial: Constant Contact, MailChimp, AWeber, GetResponse, Campaign Monitor.
3. Payment Integrations: Are test payments successful?
Our payment addons, Stripe and PayPal, both include options to test before accepting real payments. For more details, please see our tutorials on testing form payments in Stripe and PayPal.
Does Your Form Have a Clear Purpose/Instructions?
If a user understands why they’re being asked to complete a form, they’re much more likely to fill it out accurately and complete the submission.
1. Form Name: Does the form name indicate a clear purpose?
Examples: “Get in Touch” or “Place Your Order”
2. Form Description: Would user instructions be helpful? Have you helped set user expectations?
Example: “Please share any questions in the form below. We’ll be in touch within 1 business day.”
3. Field Details: Is it clear exactly what content/format you’d like for each field?
Example: Content and format details can be shared in the field label, description, and/or placeholder.
Is Your Form Too Long?
Shorter forms are easier for a user to complete. If your form requires more than a few fields, there are several ways you can make this feel shorter or less overwhelming to users.
1. Field Layout: Could your form fields be arranged in a multi-column layout?
Example: Short content fields, such as Email or Phone, work well for multi-column layouts.
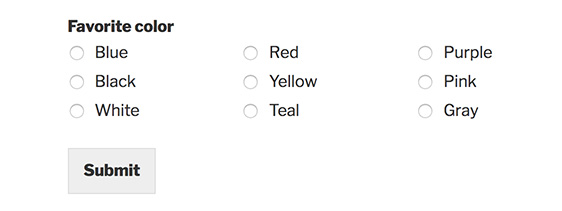
2. Checkbox & Multiple Choice Layouts: If you have Checkboxes or Multiple Choice fields, could they be placed into columns?
Example: When a multiple choice field with lots of short options is in multiple columns, it’s easier to see all options at once.
3. Conditional Fields: Are there some fields that only certain users need to fill out?
Example: If a user shares a 1 or 2 star rating in our feedback form, we’ll use conditional logic to display a field asking for more details. Users who share higher ratings will not see this extra field.
4. Dividing Content: Would your form be easier to read with section dividers? Could your form logically be split into multiple pages?
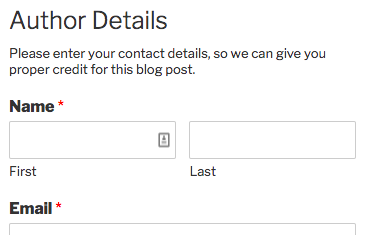
Example: Within our Blog Post Submissions Form template, we use Section Divider fields to separate sections titled “Author Details” and “Create a Blog Post”. This provides logical separation, and also gives us a chance to provide extra details/instructions in the description.
Is the Form Confirmation Helpful for the User?
After submitting the form, the confirmation message or page will display.
A confirmation message or thank you page is a great place to show appreciation for the submission, set expectations for response time, and/or guide the user to next steps. For inspiration, check out our article with Thank You page examples.
Does Your Form Work Well on Mobile Devices?
WPForms is designed to be mobile-responsive, and will adapt to look great on mobile devices. However, depending on your customizations and site theme, additional adjustments may be needed.
To test, try filling out and submitting the form within your phone’s browser.
What to Do If You Have Questions
Have you located an issue that you’re not sure how to fix? Our guides to troubleshooting site errors and resolving CSS issues may help.
If you give these tutorials a try and still have questions, please share these with out support team and we’ll be happy to assist.
That’s it! We hope this guide helped you to test your forms before adding them to your site.
Next, would you like to learn more about entry management in WPForms? Be sure to check out our guide to form entries to see all the details.