Have you created custom CSS for your forms, but not been able to see those styles when viewing your site? In this tutorial, we’ll walk through options to troubleshoot why your CSS is not working and offer possible solutions.
We’ll discuss the most common issues that cause CSS to not work:
Browser Caching
Browsers will often cache, or temporarily store, resources from websites you visit in order to improve load speed. Some sites will also use plugins for additional caching. Often when you don’t see your custom styles on your site, it’s because the browser or other system has cached an older version of your site.
Here’s a tutorial that’ll walk you through all of the main steps to clear your site and plugin caches.
If clearing your browser cache doesn’t seem to work, here are a couple of additional strategies to try:
Try a Different Browser
Each browser will keep its own cache of the sites you visit. By opening your site in a different browser (or in the private mode offered by some browsers, such as Chrome’s incognito window), you can often see an uncached version of your site.
Ask Your Host if They Have a Cache
Some hosts will provide caching for your site right in their servers, which is where your site files are stored. If you’re not sure, you may want to contact your host to ask if they are caching your site and, if they are, ask them to clear that cache for you.
Try a Different Internet Source
Occasionally, just loading your site over a different internet source can help to bypass an existing cache. If you have a mobile device with available data, the simplest way to do this is to temporarily turn off WiFi on your device and reload the page.
Invalid CSS Format
CSS must be written in a specific format in order for a browser to understand it. There are many online tools to check that your CSS is valid, including W3School’s CSS Validator. This is an excellent option if you have a lot of custom CSS and at least a little previous experience creating CSS.
If you are only using a small amount of CSS, however, it may sometimes be easier to do a quick format check of your own. Let’s start by looking at a snippet of valid CSS:
div.wpforms-container-full .wpforms-form .wpforms-title {
    font-size: 26px;
    margin: 0 0 10px 0;
}
Here’s why this CSS is valid, or ‘readable’ by browsers:
- Correct selector format: If the selector includes multiple parts, it needs to be written from ‘biggest’ to ‘smallest’. In the example above,
div.wpforms-container-fullis the biggest container element in the HTML, while.wpforms-formis inside of that container. The smallest and last item in the selector,.wpforms-title, is contained inside of both of those other elements. In any other order, the browser won’t be able to read this selector. - Two brackets: There must be a curly bracket right after the CSS selector and at the end of the property/value list. Forgetting that closing bracket is a common mistake, and will usually prevent all CSS below it from being shown in the browser.
- Colon and semicolon: Be sure to include a colon (:) between every CSS property and value (for example,
font-size: 26px) and a semicolon (;) after every value so the browser can read your CSS. - Correct use of whitespace: For the most part, CSS isn’t very picky about whitespace (which includes tabs and spaces). An exception to this, however, is for units.
26pxwill work, for example, while26 pxwill not.
For more information on writing CSS with proper syntax, you can check out this tutorial from W3Schools.
CSS Specificity
Since all themes and most plugins contain their own sets of styles, you will often find that your custom styles must “compete” against existing styles. In such situations, the more specific CSS selector will almost always win out over a less specific selector.
For example, here’s the default CSS that sets the font size of form titles in WPForms:
div.wpforms-container-full .wpforms-form .wpforms-title {
    font-size: 26px;
}
Let’s try to override that CSS to make the font bigger. It may be tempting to use a short CSS selector, like this:
.wpforms-title {
    font-size: 40px;
}
That CSS is valid, but its styles won’t come through in the browser. The default styles will be applied instead because they have a more specific selector. You would instead need to use the same, longer selector as the default style for your custom CSS:
div.wpforms-container-full .wpforms-form .wpforms-title {
    font-size: 40px;
}
For more info on selectors, you can check out this list of WPForms form field selectors and their default styles.
Using !important in CSS
In some situations, you can force a less specific snippet of CSS to work by including an !important before the semicolon. It’s always better to try a more specific selector (as described above) first, but sometimes this can offer a quick fix.
It’s important to note, however, that adding !important will not always work. Let’s try this approach for the CSS we discussed in the last example:
.wpforms-title {
    font-size: 40px !important;
}
In this situation, the browser prefers the specificity of the default CSS over the !important, and so this CSS will not be applied on your site.
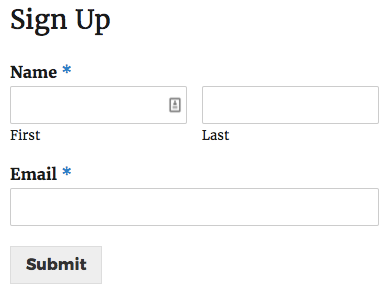
Let’s look at an example where adding an !important does work. By default, the asterisk that marks a ‘required’ field in WPForms will be red:
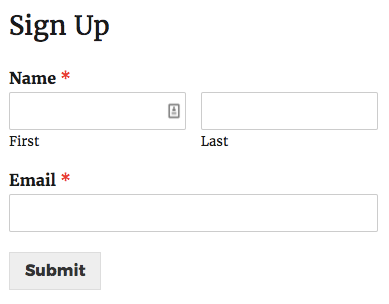
Here is the CSS that creates that style (#ff0000 is a hex code for red):
div.wpforms-container-full .wpforms-form .wpforms-required-label {
    color: #ff0000;
}
We want to make these asterisks appear blue instead. We could copy that full selector from the CSS above, or we could use a short selector and add an !important, as in this CSS snippet:
.wpforms-required-label {
    color: #007acc !important;
}
It can be tough to know whether or not an !important will work, so you’ll likely need to give it a shot and test it out.
That’s it! We’ve covered the most common troubleshooting strategies to use when CSS isn’t working. If you’re still having trouble styling your WPForms, please get in touch with support so we can help you out.