There are two default methods of adding content into a site: posts and pages. Both of these content types have a similar creation process so the editing page will become familiar quickly.
However, we must first differentiate between posts and pages, and when you need them.
Posts
Posts are what make your blog a blog — they’re servings of content that are listed in reverse chronological order on your blog’s front page. Posts are always associated with a date, which is included in the URL.
Due to their reverse chronological order, your posts are meant to be timely. Older posts are archived based on month and year. As the post gets older, the deeper the user has to dig to find it. You have the option to organize your posts based on categories and tags.
Pages
Pages are meant to be static “one-off” type content such as the about page, privacy policy, legal disclaimers, etc. While the website database stores the published date of the page, pages are timeless entities. For example, your about page is not supposed to expire. Sure you can go back and make updates to it, but chances are you will not have about page 2012, about page 2013 etc.
Pages are not meant to be social in most cases thus does not include social sharing buttons, or comments. You don’t want users to comment on your contact page, or your legal disclaimers page. Just like you probably don’t want others to tweet your privacy policy page in most cases.
Unlike posts, pages are hierarchical by nature. For example, you can have a subpages within a page. This feature allows you to organize your pages together, and even assign a custom template to them.
Having gone through the differences between the two, let’s go through the creation process. The easiest way to add new pages or posts is with the New button on the toolbar (it appears at the top of your screen when you’re logged in to your website).
When you click on “Posts” or “Pages” a table will list out content sorted by recent publication date. You’re free to search this table using keywords found in the post title. By clicking on a title you’ll be taken to the editing page which shows all of the current information for that post or page.
Creating a new post looks identical to the edit screen except a new post is completely blank. Features are located in the exact same position so it’s easy to grow accustomed to how it all works.
You can create the post’s or page’s content using the block editor or the page builder. Learn how to use the block editor or page builder.
An excerpt is only used in blog posts because it’s not needed for pages. When visitors are browsing the homepage or archives listing they’ll see post excerpts and a read more link. By clicking the link visitors will be taken to the full article page.
One other important aspect of the editor is how you upload images. These can be uploaded individually or in bulk from the “Add Media” button. It opens an overlay window containing an upload form where you can select images from your computer to add into your site’s media manager. Then images can be directly added into a post using this same media editor.
The great thing about this editor is that all media can be accessed from any post or page. So if you have images that should be re-used there’s no need to upload them multiple times. Just search through the media listing, find your image, and then add it into the content.
Categories & Tags
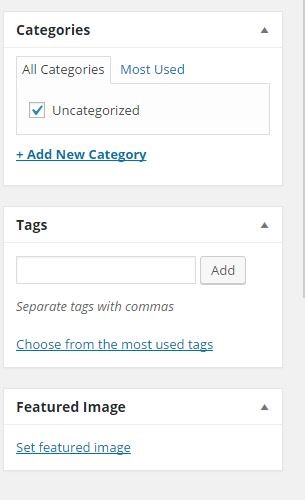
To the right-hand side of the editor window are some information boxes. At the top is a publishing box followed by categories and tags.
Some bloggers use only categories and no tags. Others choose to use both with multiple tags and categories. How you want to use these features is entirely up to you.
The most common method is to select only 1 category per post with multiple tags. This way posts can be archived into single categories but also searched by tag keywords.
Categories are selected by checking an existing choice, or adding your own from the “Add New Category” link. Tags are added manually by typing in the tag name and clicking “Add”. As you type it will offer suggestions based on tags that have been used before. But you can also select from a pre rendered tag cloud by clicking the “Choose” link.
If you only go with one of these details it’s recommended to go with categories. They are seen as more hierarchical and important to blog organization.
Publishing & Extra Features
When the post has a title, some content, and you’ve setup a category (or categories) then it’s time to deal with publishing. Not every post needs to be published right away because sometimes you’ll want to save it as a draft for future editing. Other times a post won’t need editing but it should be published at a later date.
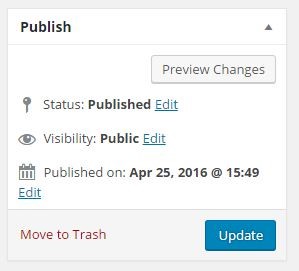
To save the post as a draft click the “Save Draft” button in the top-left corner of the publishing window. To publish right away click the big blue “Publish” button. And if you want to delete a post click the red “Move to Trash” link.
But to schedule the post for a future date requires a little bit more work. Notice where it reads “publish immediately” and beside the text there’s a little edit link. Click edit and you can adjust the date to be anytime in the past or future.
By dating a post to the past it’ll be published right away, but the publishing date will say whatever you set it to. By scheduling a post in the future the post will automatically go live to your blog at the exact date and time you choose.
You’ll know a post has been set in the future because once you hit OK the blue button’s text will change from “Publish” to “Schedule”.
This covers all of the basic functionality when writing or editing a new post. There are some other things you can setup like featured images and custom excerpts, but they’re not required.
By default these options may be hidden from sight. To view these boxes locate the “Screen Options” tab in the top-right corner. This will again provide a toggle menu with checkboxes for individual features. Check the ones you want to see, uncheck the ones you want hidden. You can also change the number of columns or extend the post editor to be full-height based on content size.
The interface is quite straightforward and very easy to change as you grow familiar with the admin area.