Would you like to customize the appearance of your WordPress forms? In WPForms, you can easily add custom CSS classes and styles to make your forms look how you’d like.
In this tutorial, we’ll show you how to add custom CSS classes to style specific form elements, as well as how to add any custom CSS to your WordPress site.
- What’s a CSS Class?
- How to Add Custom CSS Classes in WPForms
- How to Create and Add CSS Styles for Your Site
What’s a CSS Class?
CSS classes are a way of targeting which elements you’d like to style in your website.
In WPForms, fields are automatically assigned several CSS classes. For instance, if a field is set to a Field Size of Large, it will be assigned the CSS class wpforms-field-large. However, this class is only useful for custom CSS if you’d like to style every large form field on your site.
By adding a custom CSS class you can easily target a specific form field, or apply the same styles to multiple fields.
How to Add Custom CSS Classes in WPForms
In WPForms, you can add your own custom CSS classes to individual form fields, the submit button, or the container around your form.
Adding CSS Classes to Individual Form Fields
To add a custom CSS class to a form field, first create a new form or edit an existing form.
Within the form builder’s preview panel, click on the field to open its Field Options. Then, open the Advanced Options section and look for the field labeled CSS Classes.
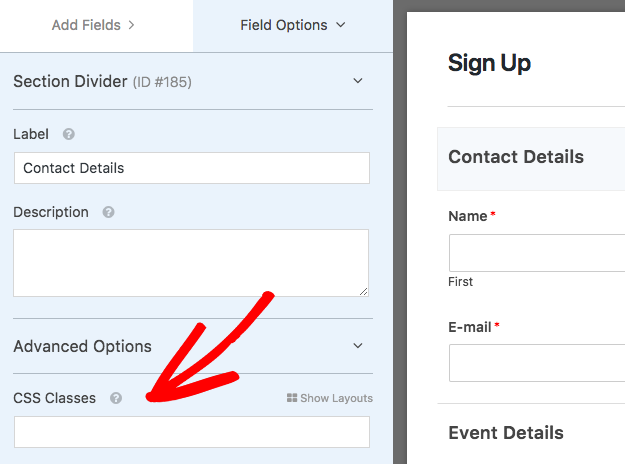
When naming a CSS class, all letters must be lowercase and no spaces are allowed. If you’d like the class name to contain more than one word, include a hyphen (-) instead of a space. For this example, we’ll name our CSS class wpf-blue-background.
By adding wpf- to the beginning of our classes, we’re less likely to add a class name already being used by our site’s theme. This will help to avoid style conflicts and make it more likely for our styles to be applied successfully.
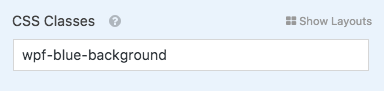
You can add additional classes to this field also, if you’d like. To do that, simply add a space between each class name. For example:
wpf-blue-background wpf-bold-font wpf-xl-margin
Adding CSS Classes to Form Container or Submit Button
For some styles, it may be useful to target the form’s container or its submit button.
For example, you may want the submit buttons for all sign up forms on your site to be styled one way, and for the submit buttons in any general contact forms to be styled a different way. An easy way to accomplish this is by adding the same CSS class to the any submit button that you’d like to be styled the same way.
To add a custom CSS class name for either option, open the form builder and go to Settings » General. From this tab, you’ll be able to see fields for Form CSS Class and Submit Button CSS Class.
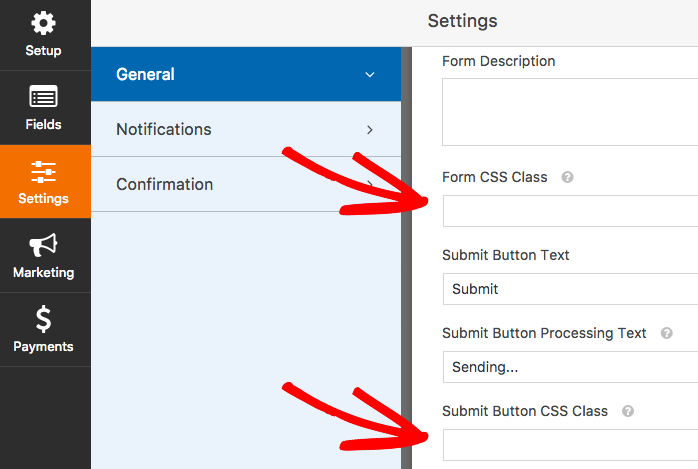
If you’d like to add more than one class name, just separate each with a space. Also, remember that class names can only include lowercase letters and hyphens (-).
How to Create and Add CSS Styles for Your Site
Now that you’ve added a custom CSS class to a field in your form, you can create the styles you’d like applied.
Creating CSS Styles
CSS is a powerful tool with an extensive amount of styling options available. For instructions on how to get started with creating CSS, please see our Beginner’s CSS Guide.
For our example, we’ll simply add a blue background to any field with the class wpf-blue-text. When writing a class name within CSS, it must always begin with a period (.), for example .wpf-blue-background.
Since many styles are already being applied to your form, it’s also a good idea to make your CSS more specific. To do that, simply add div.wpforms-container-full .wpforms-form in front of your custom class name.
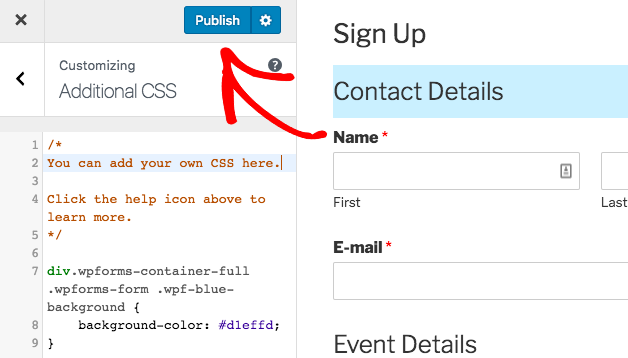
Here’s our example CSS:
div.wpforms-container-full .wpforms-form .wpf-blue-background {
    background-color: #d1effd;
}
Adding CSS to Your WordPress Site
One quick and easy way to add custom CSS to your site is with the WordPress Theme Customizer. This is a popular option because it’s available in almost all themes and has a live preview area.
If you’d like to see additional methods, please see WPBeginner’s tutorial on how to add custom CSS to WordPress.
To access the CSS area of the Theme Customizer, go to Appearance » Customizeand then select the tab labeled Additional CSS.
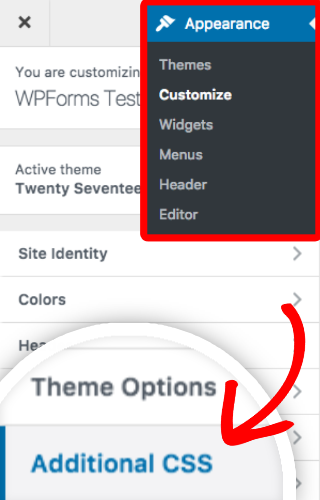
Then, under the instructions comment, go ahead and add your custom CSS snippet. If you’d like, you can also use the preview area to check out your style(s) before saving. When you’re ready, click Publish.
That’s it! You can now add custom CSS classes to style specific areas of your forms.
Would you also like to view and modify our built-in form styles? Check out our tutorial on customizing individual form fields for all the details.