Would you like to auto-fill a text field for a user based on the link they click? Links can be set up to send information into a field so the user can save a step when filling our your form.
In this article, we’ll show you how to leverage query strings to auto-fill a field in a form.
What Is a Query String?
A query string is a part of a URL that either delivers or retrieves information. On some sites, for example, query strings are used to run searches for posts or products.
If you’ve ever noticed a URL with a question mark in the middle, you’ve seen a query string in action. A URL with a query string will look something like this:
http://example.com/plugin?name=wpforms
In this article, our focus is to use a query string to insert a specific word or phrase into a form field.
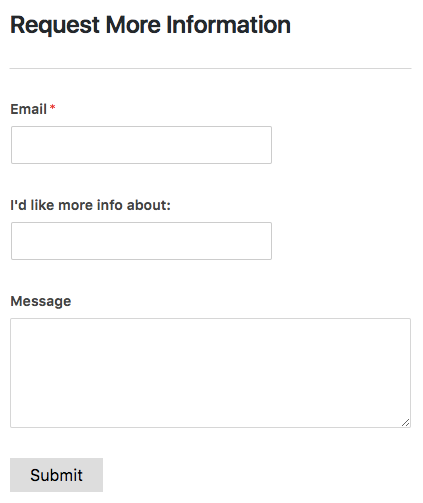
To do this, we will create a special link users can click if they would like to learn more about “Parties and Events”. The URL for that link will take the user to our “Request More Information” form and, because of the query string we’ll add at the end of that URL, the “I’d like to know more about” field in that form will be auto-filled with “Parties and Events”.
Create Form and Add Field Key
For this example, we will create a link that will auto-fill a Single Line Text field in our form.
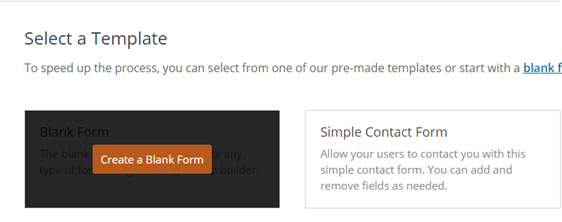
To get started, you’ll either need to create a new form or edit an existing form with WPForms.
If you are creating a new form, you’ll need to provide your form with a title and choose a template. We’re using the Blank Form template here.
We’ll be adding the following fields to the form: Email, Single Line Text, and Paragraph Text.
Next, we need to set the default value for Single Line Text (which we’ve renamed to “I’d like to know more about”) to be ready to accept information from a query string.
To do this, click on the field to open the Field Options screen. From here, you’ll need to open Advanced Options, scroll to the box labeled Default Text, and then click on Show Smart Tags.
From this list, select the option called Query String Variable.
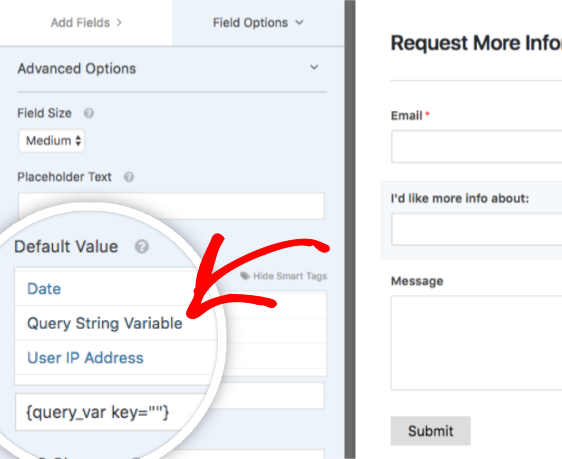
Once you’ve made this selection, you’ll notice that {query_var key=""} has been added to the Default Text box. Between those empty quotes, you need to add a name (called a key) to represent this field. This key will be used later in our query string.
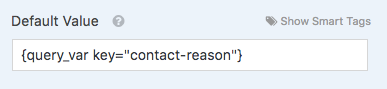
We’ll give our field a key called “contact-reason”. It is important to note that the name you use for this key will be visible in the URL we set up later, and so should be logical. Also, this key should not include any spaces, instead using a dash “-” or underscore “_” in place of a space.
Publish Form and Create Link with Query String
Now that you’ve set up the form, you can go back to your WordPress dashboard. You can either create a new page or edit an existing page to publish the form you just created.
To publish the form, click the Add Form button just above the text editor. Now you’ll be asked to select a form. Select the form you just created and click the Add Form button.
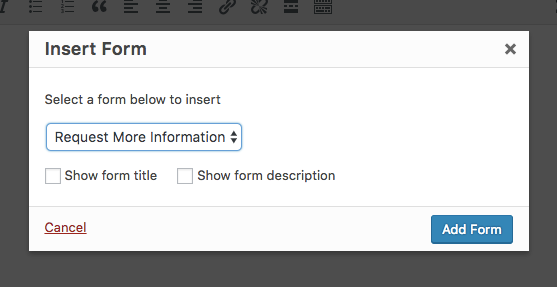
Your form is now embedded on the page, so you can publish your page and visit it on the front end.
Next, you’ll need to create another new page or edit an existing page where we can add a link to this form.
In this example our form is on our contact page, so a standard link would look something like: http://mydomain.com/contact. We’ll link some text to that first.
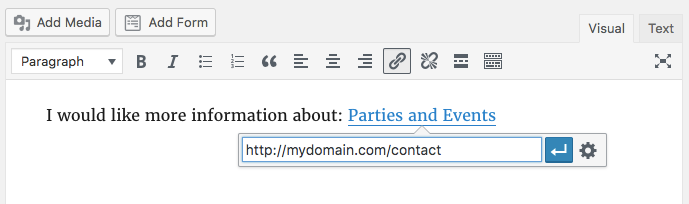
Right now, that link will simply open the Contact page. Next, we’ll modify this link to contain a query string. This modified link will not only open the contact page, but pass a query string that auto-fills the Single Line Text field in our form:
http://mydomain.com/contact?contact-reason=EventsandParties
Here is how we built this new link, in order of its components:
- The normal link (http://mydomain.com/contact)
- A question mark
- The key you designated earlier (in this example, contact-reason)
- An equals sign
- The text you want to be auto-filled
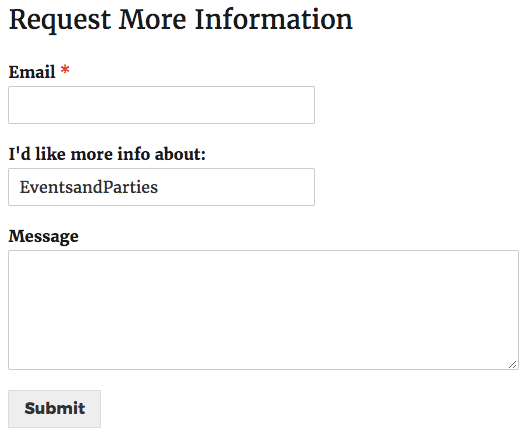
By clicking on this link, our Single Line Text box will be auto-filled with any text after the equals sign. In this case, the link above will put “EventandParties” in that field:
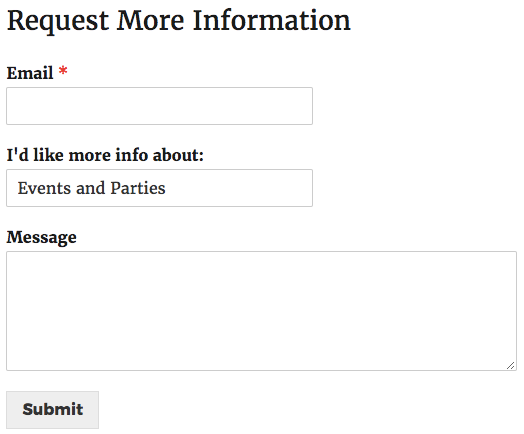
To add spaces to the text that appears in this field, just place “%20” (no quotes) anywhere you would like a space to appear. For example…
http://mydomain.com/contact?contact-reason=Events%20and%20Parties
…will add a space to result auto-fill text that reads “Events and Parties”:
http://mydomain.com/contact?contact-reason=Events%20and%20Parties&second-field=OtherValueThat’s it! We hope this tutorial helped you to set up links with query strings that will auto-fill a text field on a form.
Next, you might also want to see our guide on how to create dynamic field choices to list post titles or categories.